Andyjr1515 Posted May 26, 2023 Author Share Posted May 26, 2023 (edited) 32 minutes ago, Matt P said: that's one handsome guitar, has a finish been decided on yet? gloss/satin, how much do you expect the alder to darken? i'm loving the curves of this one. Matt Thanks, Matt I haven't talked to Alex yet other than agreeing from the start that it will be unstained clear finish. I suspect we will go with a satin finish - probably Tru-oil slurry and buffed. The ebony will darken for the black bits and the figuring will bring out some soft oranges and yellows. The maple will darken and the yellow tint coming out to an extent. The alder, when dampened, darkens also but there is - to my eyes - a pink tinge coming through the general 'wood colour' I'm pleased with how it's starting to look. Edited May 26, 2023 by Andyjr1515 1 Quote Link to comment Share on other sites More sharing options...
Andyjr1515 Posted May 26, 2023 Author Share Posted May 26, 2023 2 hours ago, Matt P said: that's one handsome guitar, has a finish been decided on yet? gloss/satin, how much do you expect the alder to darken? i'm loving the curves of this one. Matt Couldn't resist doing a full mockup. In elapsed time (some pesky family commitments getting in the way ) this is probably around 4 weeks away from finish but, from the front view, it's getting pretty close. In the third pic, @Matt P, I also gave the top half a wipe with a damp cloth to show what the final colour will be. Seeing this, I'm certain tru-oil slurry and buff satin finish is the way to go : 3 1 Quote Link to comment Share on other sites More sharing options...
Andyjr1515 Posted May 29, 2023 Author Share Posted May 29, 2023 I've updated Basschat with up to the above stages. The next couple of weeks are going to be a bit bitty - I need Alex here to fine-tune the neck profile and his and my calendars are like ships passing in the night! In the meantime, someone on Basschat was interested how the Steinbergers work - below is what I posted if it is of any interest : You wind the knob at the back until the spindle rises to the top, exposing the string hole at its base: You thread the string through the hole and pull tight while clamping it by rotating the 'T' bar at the top (the T is a simple screwed clamp): You then rotate the knob at the back in the opposite direction, which pulls the spindle down into the housing and takes the string with it, tightening it as it goes. This is the 4th string now at full pitch: Clearly, the far end of the string can be clipped at the other side of the spindle but, while I am fitting am removing the strings regularly, it is easier to leave them long. It is a very clever design and they are well made: They are as smooth as silk. No backlash and very accurate and controllable tuning. They can be placed anywhere, unlike conventional tuners that have to be close enough to the headstock side for the adjuster clearance. And so, the headstock can be any shape you like. The string is always 'at the bottom of the peg', maximising break angle over the nut 2 1 Quote Link to comment Share on other sites More sharing options...
EdwardMarlowe Posted June 7, 2023 Share Posted June 7, 2023 On 20/05/2023 at 08:50, ezbass said: Only access to the 19th fret? That’s way high enough IMO. Plenty of notes lower down to make a statement, without annoying the local dog population. Quite so. Never had much use for anything above the 15th fret myself. But then my guitar heroes are Steve and Mick Jones, Johnny Ramone, Link Wray.... not yer Satriani / Vai types(talented as they undeniably are!) 1 Quote Link to comment Share on other sites More sharing options...
EdwardMarlowe Posted June 7, 2023 Share Posted June 7, 2023 On 24/05/2023 at 07:17, randythoades said: Wow...! Just been reading this through. Looks like an amazing project and done with such skill. I would like to do something like this when work and family pressures begin to take less of my time. Just for myself really. I have built several 'custom' guitars but always been 'partscaster from a variety of bits' type projects, so nothing as major or personal as this. Most I have done on the woodwork side is using a complete body blank (strat) to add a hardtail tele bridge and pickup cavities, and that was scary enough! Fantastic job. I hear you. One day I'd love to go on one of those guitar-building courses where you put it together over a couple of long weekends, building from scratch with expert tuition and guidance.... We should one day have a GuitarChat get together at one of these.... This is a fantastic project, really impressive to see it coming together. I always wanted a guitar that is somewhere between a Firebird, an RD Artist and a Squier Supersonic. Fender 68 Strat style maple net with the CBG headstock, blue sparkle body. I did always say I wanted a bolt on, but seeing this I could imagine myself wanting to go for a through neck, that's something I've never had.... 1 1 Quote Link to comment Share on other sites More sharing options...
randythoades Posted June 8, 2023 Share Posted June 8, 2023 (edited) 10 hours ago, EdwardMarlowe said: I hear you. One day I'd love to go on one of those guitar-building courses where you put it together over a couple of long weekends, building from scratch with expert tuition and guidance.... We should one day have a GuitarChat get together at one of these.... This is a fantastic project, really impressive to see it coming together. I always wanted a guitar that is somewhere between a Firebird, an RD Artist and a Squier Supersonic. Fender 68 Strat style maple net with the CBG headstock, blue sparkle body. I did always say I wanted a bolt on, but seeing this I could imagine myself wanting to go for a through neck, that's something I've never had.... That sounds like a great idea, we could do a GC build workshop! My plan for semi retirement (still a few years away) is to do one of those longer 3 months courses, where you learn literally everything and end up building several instruments to get up closer to the skill level needed to build a custom guitar like this. My personal choice would be a lightweight, thinline esquire / LP jr / cabronita type arrangement with a single Gretsch pickup or p90. But there is a place down in Sussex (www.guitartechcourses.com - Guitar Tech Courses) that offers a shorter weekend course to build F styled guitar using various parts. I did their Pro Setup course (a present from my wife), which has to be the best money ever spent on guitar pursuits, so I suspect the building course would be a similar level of quality. I am comfortable now mixing and matching but never attempted frets or carving anything! Edited June 8, 2023 by randythoades 2 Quote Link to comment Share on other sites More sharing options...
EdwardMarlowe Posted June 8, 2023 Share Posted June 8, 2023 (edited) 5 hours ago, randythoades said: That sounds like a great idea, we could do a GC build workshop! My plan for semi retirement (still a few years away) is to do one of those longer 3 months courses, where you learn literally everything and end up building several instruments to get up closer to the skill level needed to build a custom guitar like this. My personal choice would be a lightweight, thinline esquire / LP jr / cabronita type arrangement with a single Gretsch pickup or p90. But there is a place down in Sussex (www.guitartechcourses.com - Guitar Tech Courses) that offers a shorter weekend course to build F styled guitar using various parts. I did their Pro Setup course (a present from my wife), which has to be the best money ever spent on guitar pursuits, so I suspect the building course would be a similar level of quality. I am comfortable now mixing and matching but never attempted frets or carving anything! A parts-assembly one would also be interesting.... As very much a Fender/Fender style man myself, I would love the idea of something in between - pre-done necks, bodies with pre-cut pup / neckpocket / bridge / et al routes, but a huge, square blank otherwise so they could be cut into a custom shape... that would be interesting. (Wonder why that's never been on the parts market before - unless I missed it?). The set-up course sounds great, too - that's something I can see me benefitting from in a big way. Edited June 8, 2023 by EdwardMarlowe 2 Quote Link to comment Share on other sites More sharing options...
Andyjr1515 Posted June 11, 2023 Author Share Posted June 11, 2023 On 08/06/2023 at 13:00, EdwardMarlowe said: As very much a Fender/Fender style man myself, I would love the idea of something in between - pre-done necks, bodies with pre-cut pup / neckpocket / bridge / et al routes, but a huge, square blank otherwise so they could be cut into a custom shape... that would be interesting. (Wonder why that's never been on the parts market before - unless I missed it?) Sorry for the delay - just got back from a ridiculously sunny trip to the Scottish Islands! I might be wrong, but I was sure that I've seen something like that in the past on the market. I'll have a dig around and see if it was just in my imagination. 1 Quote Link to comment Share on other sites More sharing options...
Andyjr1515 Posted June 11, 2023 Author Share Posted June 11, 2023 22 minutes ago, Andyjr1515 said: Sorry for the delay - just got back from a ridiculously sunny trip to the Scottish Islands! I might be wrong, but I was sure that I've seen something like that in the past on the market. I'll have a dig around and see if it was just in my imagination. I might be thinking of Warmoth - here you start with a blank and then can add through their configurator the various routs and drill holes you want. Looks pricey, but a decent blank piece of alder that I would use starts off at anything from £90 to £150 here in UK. I think other suppliers do something similar and probably cheaper - I'll carry on looking Warmoth necks are great...but VERY expensive. However, there are a myriad of perfectly decent 'Fender standard pocket' necks available for less than (and some cases, much less than) £100 that an internet search will find (Gear4Music is a decent place to start). 2 Quote Link to comment Share on other sites More sharing options...
Andyjr1515 Posted June 11, 2023 Author Share Posted June 11, 2023 9 minutes ago, Andyjr1515 said: However, there are a myriad of perfectly decent 'Fender standard pocket' necks available for less than (and some cases, much less than) £100 that an internet search will find (Gear4Music is a decent place to start). Such as these: 2 Quote Link to comment Share on other sites More sharing options...
randythoades Posted June 13, 2023 Share Posted June 13, 2023 (edited) On 11/06/2023 at 15:39, Andyjr1515 said: Such as these: I have done exactly this, as well as just purchased necks on eBay as they sometimes have tuners included. Got a great Squier Korean maple neck and an even greater Aria XL neck 9with sharkfin inlays) in this way. Don't have to worry about varnish then either. Edited June 13, 2023 by randythoades 2 Quote Link to comment Share on other sites More sharing options...
Andyjr1515 Posted June 14, 2023 Author Share Posted June 14, 2023 Well family stuff and domestic 'projects' largely clear and so I'm back to the build I'm not quite at the final furlong stage, but certainly getting closer to it. Next jobs were to finish the rough carving on the back and getting ready to sort the control chamber hatch. For the carve at the back, because it's curved, I am mainly using the larger of the two round-bottomed Ibex thumb planes and also the gooseneck card scraper: Don't let anyone tell you the Ibex planes are toys - they really are precision planes: Those curly shavings are rock maple and ebony! I used a bottom bearing rebate router bit to follow the chamber and mark the outer edge of the rebate - but the curve of the back makes it difficult to get an even depth of cut and so the rebate was cut to final depth using carpenters mallet and some sharp chisels. Done, ready to create the paper template and cut the hatch: 3 1 Quote Link to comment Share on other sites More sharing options...
Andyjr1515 Posted June 17, 2023 Author Share Posted June 17, 2023 To the back hatch. You will note that there is always a bit of madness in my method when it comes to guitar and bass builds. Does that rebate rout above cut into the ebony strip? And doesn't that mean that the black line will be broken with an alder hatch when it's fitted?? Well...yes...and no. Yes it would if I didn't add a matching strip to the hatch I made my normal paper template with some A4 and a fingernail: Cut out with a scalpel, I then had a template for the wood that I could double check fitted properly into the rebate, and also a reverse template so I could choose a 'sympathetic' grain pattern from my various alder offcuts. This would probably work: So next job was to cut out the hatch - a teeny bit oversize - and add a matching ebony strip: To fit the hatch, I usually start at one of the curves and sand/check the radius repeatedly until it fits the rebate exactly, and then progressively sand the overhang from there at one side or the other to progressively create the close fit all the way round. It takes a while because you don't want to over-sand anywhere! But eventually, it's done: And the ebony strip lines up! Next step is stringing it up for Alex to be able to play it while I fettle the shape of the neck profile, and then I can start the final sanding and start on the finish 2 1 Quote Link to comment Share on other sites More sharing options...
ezbass Posted June 17, 2023 Share Posted June 17, 2023 This attention to the detail of the finished product is astonishing and very pleasing. 1 1 Quote Link to comment Share on other sites More sharing options...
Andyjr1515 Posted June 20, 2023 Author Share Posted June 20, 2023 (edited) I spent some time this morning with the guitar strung up and on a strap for me to 'fit' the neck profile to suit Alex's style of playing. Basically, he played, I then scraped material off the neck haunches and then he tried it again. This was repeated over an hour until it 'felt right' for him. We can do further tweaks once it's finished and he can play it with amp/etc but it's probably close enough for me to start the final sanding, which I started this afternoon. As folks who have watched other builds will know, I often use some Tru-oil slurry and wiped to act as a grain filler and also as a reveal coat... to spot dints and lumps or sanding marks that are difficult to see on dry sanded wood. The good thing is that it also lets bot Alex and me see how the final colours and grain are going to turn out to be. I think it's going to be quite nice: Edited June 20, 2023 by Andyjr1515 3 1 Quote Link to comment Share on other sites More sharing options...
Dad3353 Posted June 20, 2023 Share Posted June 20, 2023 18 minutes ago, Andyjr1515 said: ...I think it's going to be quite nice:... Understatement. 1 1 Quote Link to comment Share on other sites More sharing options...
Andyjr1515 Posted June 21, 2023 Author Share Posted June 21, 2023 I've added a corresponding ebony thickener at the back of the headsock and applied the second reveal coat of tru-oil after a bit more slurrying: While there is often madness in my method with my builds, every now and again (I suppose statistically, it must happen occasionally) there is some method in my madness In this case, it is that, because the two lower tuner positions from the upper view are the top E and B, then the break angle is maximum for these two strings. And yes - there's plenty of sanding to do here : Here's the top after the second reveal coat. That's at least starting to get there... My 'still to do' list is actually quite short. All being well, we should have a playable guitar by this time next week 1 1 Quote Link to comment Share on other sites More sharing options...
ezbass Posted June 21, 2023 Share Posted June 21, 2023 1 hour ago, Andyjr1515 said: That contouring is so organic. 1 Quote Link to comment Share on other sites More sharing options...
Andyjr1515 Posted June 21, 2023 Author Share Posted June 21, 2023 55 minutes ago, ezbass said: That contouring is so organic. Thanks. It's been a very satisfying build to do with me having been given perhaps more freedom for following personal flights of fantasy 1 Quote Link to comment Share on other sites More sharing options...
Andyjr1515 Posted June 22, 2023 Author Share Posted June 22, 2023 (edited) I mallet-tapped the outline of the rugby-ball jack plate with a variety of radius chisels and then used a small chisel to start creating the rebate: Once it was all level, I rounded the sides, drilled the hole with a 20mm forstner and popped a drop of tru-oil to match the alder before doing a trial fit: And after a couple of experiments, I had a go at the ebony. The great thing about ebony is that it will sand/polish to a good finish. What I didn't know was whether the brown streaks would behave in the same way. They do This is after around an hour, progressing through around 15 grades of emery/micromesh from 180 grit up to 8000. Nothing else - just sanding through the grades: There are a couple of dints that I will lose by repeating the process, but this will be pretty much how the top will finish up. Edited June 22, 2023 by Andyjr1515 2 1 Quote Link to comment Share on other sites More sharing options...
Andyjr1515 Posted June 25, 2023 Author Share Posted June 25, 2023 Well, on the final furlong. Basically, the finishing is finished and now just have to do the shielding, fretwork, electrics and final assembly/setup. The final stages of ebony sand-only and alder/maple Tru-oil slurry-and-buff is coming out nicely: 3 1 Quote Link to comment Share on other sites More sharing options...
Andyjr1515 Posted June 27, 2023 Author Share Posted June 27, 2023 All getting very, very close - Pickup rings are fixed - Hatch and trussrod cover magnets are in - shielding done - bridge earthed - pots, jack plate and switch in place (not wired up yet) - spacer/nut shaped ready for final slotting - luminlay side dots fitted - strap buttons fitted All being well, the next two days should see it finished and playable Here's how it's looking (ignore the overage on the two strings - the final set of fitted strings will be clipped): 1 1 Quote Link to comment Share on other sites More sharing options...
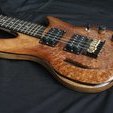
Andyjr1515 Posted June 29, 2023 Author Share Posted June 29, 2023 And...it's finished!!!! The 'last few jobs' always turn out to be a 'myriad of final jobs. Anyway, all sorted. I'm passing it across to Alex tomorrow - I will try and get him to do a bit of recording at one of their band practices but, in the meantime, you'll have to trust me when I say it sounds great . Although it is just a small wiring change and no hardware change, I've opted NOT to go for the P-rails standard wiring system which gives: Full series humbucker; parallel humbucker; P90; Rails. I've used that system in a number of my own gigging guitars and I found that: - the fact that both pickups are always in the same configuration for the four options is actually, ironically, quite limiting. I was always hankering for, such as, 'neck pickup full series humbuck for the depth, mixed with bridge pickup in split coil mode to add a bit of extra treble and dispel any muddiness' and similar - I also never, in practice, used the rails by themselves...not enough ooomph - and I never, in practice, used the humbuckers in parallel...not enough depth I talked that through with Alex and, for kickoff, we decided to have a standard split coil option for both pickups where the operating coil in each case was the P90. So he can go full series humbucker with 3 way options, P90 with 3 way options and one (either) pickup P90 and the other series humbucker. It's a 30 minute job to change the wiring to the 'P-rail standard' options if he wants to try that in the future. Anyway, here are some of the arty-farty finished pics: Thanks again for watching this develop and your kind remarks along the way 3 2 Quote Link to comment Share on other sites More sharing options...
Dad3353 Posted June 29, 2023 Share Posted June 29, 2023 1 Quote Link to comment Share on other sites More sharing options...
Crusoe Posted June 30, 2023 Share Posted June 30, 2023 Stunning. I just want to run my hand over that finish. I'd love to gig it just to see the reaction it gets. 1 Quote Link to comment Share on other sites More sharing options...