Andyjr1515 Posted May 10, 2023 Share Posted May 10, 2023 (edited) My first Guitarchat build thread! Oh no, say the folks who have followed some of my tortuous threads over on Basschat over the years! Yup. Another Andyjr1515 build thread...and it's a guitar...and you saw it here first My building has slowed down quite a bit - partly the pesky arthritis in my hands and partly the usual life's distractions - but there are one or two projects that have been on my list for years. And this is one of them. It is a variation on the theme of the iconic Gibson Firebird. 'Essence of' is probably a closer description as it aims to tackle some of the compromises of the original and is being built for a specific player and the specific way he plays. It's for my son-in-law who plays the excellent Epiphone Firebird. And can I make it better than an Epiphone Firebird? Of course not...but I can make it different. - lighter - easier to fret in the specific fretboard zones he plays - better on the strap and over the knee - less (hopefully no) neckdive - less flat-bodied And it's a chance to use this type of ebony again for those of you who saw the build thread a year or so back where I used it last: So off we go! Edited June 29, 2023 by Andyjr1515 1 2 Quote Link to comment Share on other sites More sharing options...
Andyjr1515 Posted May 10, 2023 Author Share Posted May 10, 2023 (edited) 8 minutes ago, Andyjr1515 said: My first Guitarchat build thread! No it's not! I had forgotten that I did a couple of builds a few years back before Norton decided to play its tricks on me. Anyway, this is the first build thread since then! Edited May 10, 2023 by Andyjr1515 1 Quote Link to comment Share on other sites More sharing options...
Crusoe Posted May 10, 2023 Share Posted May 10, 2023 Really looking forward to this. 1 Quote Link to comment Share on other sites More sharing options...
Matt P Posted May 11, 2023 Share Posted May 11, 2023 Subscribed! Always a pleasure to watch one of your build come together (even when it's not for me!) Matt 1 Quote Link to comment Share on other sites More sharing options...
ezbass Posted May 11, 2023 Share Posted May 11, 2023 18 hours ago, Andyjr1515 said: It is a variation on the theme of the iconic Gibson Firebird. 18 hours ago, Andyjr1515 said: - lighter - easier to fret in the specific fretboard zones he plays - better on the strap and over the knee - less (hopefully no) neckdive - less flat-bodied I’m in! The sexiest looking guitar ever built IMO, but an ergonomic nightmare. I look forward to many updates. 1 Quote Link to comment Share on other sites More sharing options...
Andyjr1515 Posted May 11, 2023 Author Share Posted May 11, 2023 I should say that this build is very specifically for Alex's (s-i-l) playing style - it wouldn't suit many players, and especially players who need decent access to the dusty end...because this one will have almost none In order to get a better balancing guitar, I am bringing the whole scale rearward - quite a lot! And, so that Alex can at least reach some of the upper frets, I'm also moving the lower horn back. Yes - I know... that is one of the primary design features of the original...I told you it was only going to be 'essence of'!!! Finally, it is going to have some curves - and a slab of the figured ebony on top. This was an early sketch: I've opted for Alder for the back and this is broadly how the two sections are planned to look. As the saying goes, 'What could possibly go wrong?' 3 Quote Link to comment Share on other sites More sharing options...
Andyjr1515 Posted May 14, 2023 Author Share Posted May 14, 2023 This is going to be a through-neck and so the first thing to do is, generally, to sort the neck. 'Sort' means choose the timbers, assemble the laminates, incorporate the neck angle into the blank, calculate the headstock angle, calculate the body depth and the neck depth... ...but you can't calculate the neck depth until you know exactly what the fretboard thickness is. So, actually, that's where I started - by radiusing the ebony fretboard blank using the excellent G&W router jig: Then fifteen minutes sanding with a sanding block removes the router marks: So now I can do all the neck calcs and cut the maple/ebony/maple blank: The neck angle is around 3 degrees, starting from where the top body 'horn' meets the neck, and I generally opt for a 10 degree headstock angle. 3 1 Quote Link to comment Share on other sites More sharing options...
Andyjr1515 Posted May 15, 2023 Author Share Posted May 15, 2023 (edited) With the neck blank done, I could start trial-fitting the wings and top. I joined the book-matched ebony top and cut out the broad shape. I also cut the alder back wings slightly oversize and a couple more strips of ebony between them and the neck and dry fitted them to make sure everything was going to end up in the right place: The ebony will have a sheet of constructional maple veneer (1.5mm) as a demarcation: All good so out came the sash-clamps: The neck is the top face of the original billet and the length between the top wing front join to the tail is angled the 3 degrees to give me the required neck angle. Double check that I've got it right before the next stage: Edited May 15, 2023 by Andyjr1515 2 1 Quote Link to comment Share on other sites More sharing options...
Andyjr1515 Posted May 15, 2023 Author Share Posted May 15, 2023 (edited) I want as much of the body weight to be towards the rear, but don't want it to be overall too heavy, so a couple of weight-relieving chambers in the front horns will be helpful. I like any use of router to be fully captive, so use the same approach that I use for pickup chambers... I start with a Forstner bit to hog out the bulk: Then use chisels and carpenters mallet to accurately cut the outline to around 10 mm deep: And then, and only then, use a top-bearing router bit to smooth the sides and cut to final depth: And, as I have the router out, I cut the channel that will be between the two pickups and through to the controls chamber for the cable runs: Edited May 15, 2023 by Andyjr1515 2 Quote Link to comment Share on other sites More sharing options...
Andyjr1515 Posted May 17, 2023 Author Share Posted May 17, 2023 Before fitting the top, I have to cut the slot for the fretboard, and before I can do that I have to cut the taper, and before I can do that, I have to slot the fretboard as, in my jig, that is a LOT easier if you are starting with parallel sides. So slotting the fretboard was next job. I use another G&W tool - their fretting mitre jig: In ebony, it is pretty hard work, but over the day all were done. Then I could both taper the board and also add a couple of mother of pearl swifts at the 12th before I fret it. I tapered the board and marked in pencil where I would eventually need to 'intercept' the ebony top: The swifts are pencilled freehand onto the sliver of mother of pearl and cut out using a jewellers saw. I then pencil round the inlays onto the ebony and carefully route out to the inlays depth using the precision base for my Dremel with a 1mm bit. I double check that they fit and then I will fill the chambers with epoxy mixed with ebony sanding dust and firmly press the inlays in. And finish with a final sand with the radius block As always, thanks for looking! 2 1 Quote Link to comment Share on other sites More sharing options...
Andyjr1515 Posted May 17, 2023 Author Share Posted May 17, 2023 (edited) I cut the top ebony around the pencilled line of the fretboard end which allowed me to lay the fretboard on the angled neck and position the top. I drilled a couple of positioning holes in the middle of the pickup positions which, with the addition a couple of kebab sticks will stop the top from floating around as it's being clamped when the glue is applied: That meant I could check that the neck angle is going to be correct for the height of a standard tune-o-matic roller bridge: And so what about the end of the fretboard that is hanging in mid air? Well, of course the offcut from the neck blank when I cut the neck angle in the first place is going to be the correct angle. So I will be able to cut a short ramp from this (ignore the odd shaped headstock in the background - that's not connected with this project ) I will also be adding a demarcation stripe of maple between the alder and ebony: And so, with the kebab sticks positioning everything until the clamps were all on and then removed before the glue set, the clamps can now go on! : Edited May 17, 2023 by Andyjr1515 3 1 Quote Link to comment Share on other sites More sharing options...
Andyjr1515 Posted May 18, 2023 Author Share Posted May 18, 2023 So why are the body wings so deep? Well - because the body cross section is going to have some curves. Mind you, that will mean a LOT of carving - and I will creep up on the final shape and let the guitar show where it wants to go... Here comes in play one of my favourite hand-tools - the Veritas Pull-shave. I think it's designed for scooping out wooden chair seats, but it's ideal for this kind of job: But I also use the block plane, razor planes and cabinet scrapers. Off and on over a few days, it's starting to take shape. Carve here is probably 50% done for the body. In between carving sessions, I also added frets to the (still unglued) fretboard: 3 1 Quote Link to comment Share on other sites More sharing options...
ezbass Posted May 19, 2023 Share Posted May 19, 2023 Looking good already. 2 Quote Link to comment Share on other sites More sharing options...
Andyjr1515 Posted May 19, 2023 Author Share Posted May 19, 2023 8 hours ago, ezbass said: Looking good already. Thanks! The observant amongst you will have noticed that, as the whole scale has been moved back and inch or so, then the upper frets are not reachable. This is one of the advantages of it being a custom build for a particular player. To get better access with the better balance could have been achieved by a deeper cutaway...but then the 'Essence of Firebird' starts evaporating rapidly - and Alex doesn't, and tells me he doesn't ever intend to, play up at the dusty end but, instead, prefers retaining a passing nod to the lower horn of his Epiphone. Once I've finished the carve, my guess is that he will be able to do top string bends up to around 19th fret but no further. And so a few jobs I can do in between continuing morphing towards the final shape. One of those is the Humbucker pickup chambers. As with the weight relief, chambers, I prefer to use a router only to deepen a chamber with a fully captive flush bearing bit. So I start off drilling the corners using a drill 1mm dia larger than the radii of the pickup and leg corners: Then I hog out with a forstner right to the very edge of the pencil marks: Then I remove the forstner 'waves' with sharp chisel and mallet and get the finished dimension to around 10mm depth to act as a guide for the router bearing: And then, and only then, get the router out to clean up the sides and achieve full final depth: To my admitted surprise, the rout did indeed cut into the cable slot I cut before adding the ebony top. Phew! 1 Quote Link to comment Share on other sites More sharing options...
Andyjr1515 Posted May 19, 2023 Author Share Posted May 19, 2023 Cutting the pickup chambers meant that I could do a mockup to talk to Alex what his preference for the position of the controls is before I cut the control chamber: And then the control chamber could be cut and the carve continued at the back - this time switching to the trusty gooseneck card scraper: Next was fitting the trussrod, cap and gluing the fretboard after laminating it with a maple and a black veneer to give me a demarcation line: Starting to get there: Time to start the neck carve and then blend that in with the continuing body carve. 2 1 Quote Link to comment Share on other sites More sharing options...
ezbass Posted May 20, 2023 Share Posted May 20, 2023 Only access to the 19th fret? That’s way high enough IMO. Plenty of notes lower down to make a statement, without annoying the local dog population. 2 Quote Link to comment Share on other sites More sharing options...
Andyjr1515 Posted May 20, 2023 Author Share Posted May 20, 2023 Like a Saville Row suit, the final neck shape will be arrived at after a number of 'fittings'. What I will do is carve the broad shape and then string it up so that Alex can play it between me scraping whispers of timber away with a cabinet scraper and repeating that until the shape is just right for him. But for that first rough cut I use a combination of spokeshave, razor plane and card scrapers. It doesn't take long to get the rough shape : And then, to be able to fit the strings, I'm going to have to fit the bridge, but to fit the bridge, I'm going to need to fit the tuners...and to fit the tuners I'm going to have to work out what I'm going to do with the headstock! Which is the next bit 1 Quote Link to comment Share on other sites More sharing options...
Andyjr1515 Posted May 20, 2023 Author Share Posted May 20, 2023 For the tuners, I am using the wonderful Steinberg gearless 'banjo' tuners. Remarkably, the Epiphone Firebirds - for a short period of time - had these fitted as standard! I reckon, if you could find one on ebay, you could take the tuners off and sell the tuners at a hefty profit! One of the splendid things about them is that they are cylindrical and strings are clamped dead centre and so they can be grouped very much closer together than standard tuners - to the point that I won't have to add 'wings' to the headstock. Keeping all the string runs straight, this is what I came up with: And, to keep the body vibe, I wondered if I could do a cutaway plate, something like this. BTW, you can see here I had already popped a couple of ebony sides on in the expectation of needing small maple extensions...which I now realise I don't need : So, with a piece of the offcut from the body ebony, I gave it a try. Yup, I think this works: Before gluing the plate on, in addition to backing it with a maple and black veneer, I cut the trussrod access out of the plate. It will be magnetically held as a flush cover and thus be pretty unobtrusive. Here it is out: ...and here it is in place: Next jobs include, a little more body carving, temp-fitting the tuners, fitting the T-o-M and stoptail, stringing up, 'live' shaping of the neck next time Alex is free. 2 1 Quote Link to comment Share on other sites More sharing options...
Andyjr1515 Posted May 21, 2023 Author Share Posted May 21, 2023 The Steinberger tuners are pretty easy to fit, although this little pin hole does have to be in the right place! And tuners temporarily fitted for me to be able to set up a couple of strings to position and line up the tune-o-matic bridge before the scary insert marking and drilling! Still some more subtle curve carving to do, but I'm pleased how this is beginning to look: 1 1 Quote Link to comment Share on other sites More sharing options...
Andyjr1515 Posted May 22, 2023 Author Share Posted May 22, 2023 Next is lining up the bridge. If ever there was a 'measure 14 times, drill once' it's this! First thing I did was to check the full movement of the bridge rollers from fully forward to fully back. Probably enough for a square-on positioning - but there's no point in even banking on that and so I will incorporate a modest bacward sweep to aid the intonation of the bass strings. Then to position, I fitted a couple of strings, threaded through the stop tail to the outermost tuners and taped it into position. I could then slide the roller bridge under the strings and position it to scale length on the top E with the roller fully forward (intonation for the top E is usually relatively close to scale length but, if anything, will be a teen bit further back - it will never be shorter than scale). Then, once I'd positioned it so that the two strings were where I wanted them in relation to the fretboard sides, I could press the spike of a bradpoint drill in to mark the centre: Then use a forstner for the bridge insert-holes: And finally, with fingers crossed, hammer the inserts in and try it! Big phew! 2 1 Quote Link to comment Share on other sites More sharing options...
randythoades Posted May 24, 2023 Share Posted May 24, 2023 Wow...! Just been reading this through. Looks like an amazing project and done with such skill. I would like to do something like this when work and family pressures begin to take less of my time. Just for myself really. I have built several 'custom' guitars but always been 'partscaster from a variety of bits' type projects, so nothing as major or personal as this. Most I have done on the woodwork side is using a complete body blank (strat) to add a hardtail tele bridge and pickup cavities, and that was scary enough! Fantastic job. 2 Quote Link to comment Share on other sites More sharing options...
Andyjr1515 Posted May 24, 2023 Author Share Posted May 24, 2023 6 hours ago, randythoades said: I have built several 'custom' guitars but always been 'partscaster from a variety of bits' type projects, so nothing as major or personal as this. Most I have done on the woodwork side is using a complete body blank (strat) to add a hardtail tele bridge and pickup cavities Well - that's the lion's share of the scary bits When you get the time, then go for it! Quote Link to comment Share on other sites More sharing options...
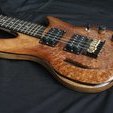
Andyjr1515 Posted May 25, 2023 Author Share Posted May 25, 2023 Stop tail is fitted and, once I've cut a proper nut/spacer, it will be able to be then fitted with a full set of strings. Still a bit more carving to do at the back, but - other than the truss rod cover is off in this shot - this is getting close to how the pre-sanding carve is going to stay: Actually, seeing that trussrod coverless, I think I'll make Alex a maple/ebony/maple truss rod cover (which would look like the above shot ) as well as the black ebony one so he can swop between gigs if he wants 1 Quote Link to comment Share on other sites More sharing options...
Andyjr1515 Posted May 25, 2023 Author Share Posted May 25, 2023 And - with neck now carved to a decent start off shape, it is ready for the Saville Row-type 'final fit' where Alex can actually pay the guitar in between me scraping further tenths of millimetres off the neck haunches. That can happen at any time and so isn't on the critical path for the myriad of finishing jobs still to do. The spaghetti of string ends is because I don't trim the ends until I've finished messing about - there will be many, many strings-on and strings-off to do before I fit the final new set! So still loads to do but at least it's starting to look like a guitar 1 1 Quote Link to comment Share on other sites More sharing options...
Matt P Posted May 26, 2023 Share Posted May 26, 2023 that's one handsome guitar, has a finish been decided on yet? gloss/satin, how much do you expect the alder to darken? i'm loving the curves of this one. Matt 1 Quote Link to comment Share on other sites More sharing options...