


Musical Mystery Tour
-
Posts
37 -
Joined
-
Last visited
-
Days Won
8
1 Follower

Recent Profile Visitors
10,353 profile views
Musical Mystery Tour's Achievements
")


-
As far as I'm aware that would have been made by the small backroom guitar maker, Gordon Parkinson. He made copies of Strats, Teles, Les Pauls, SGs and some bass guitars. As far as I'm aware they were fairly decent guitars, but sometimes a bit quirky in places, occasionally somewhat dubious finishes. Link to a facebook group about them: https://www.facebook.com/groups/622070049719625
-
That's a fairly typical budget copy of a Fender Stratocaster. Benson guitars were often on Amazon and sold in the UK, usually in 'starter sets' which included an amp, guitar strap, guitar bag, cable, picks etc. They were invariably made in China in factories which tended to make a lot of copy guitars which were somewhat randomly branded with various names and logos on the headstock, but those factories also make a lot of outsourced fancier brands with the same cutting machines, so it will be as well made as more expensive guitars in terms of the neck and body cutting and shaping. Cheap guitars these days are pretty well made. The guitars themselves are of the kind of quality where they would cost between about 65 to 100 quid if sold alone, and the amp maybe around 40 quid or so. As noted, these days such guitars are made using CNC (computer numerical control) cutting machines, so they are well shaped and finished, with the neck being a good fit in the body's neck pocket. The wood such guitars are made from varies although the neck is certainly maple, the body is probably basswood and the fretboard could be any number of different woods such as poplar or purple heart, which is often dyed to look like rosewood. Older cheap guitars (made before 2018) did tend to have rosewood fretboards, but the CITES treaty now controls the export of endangered plant species, so more recently-made Chinese guitars tend not to have a rosewood fretboard, but in any case the wood it will be made from is probably fine for an inexpensive guitar and so this doesn't matter much. What all this means is that the basic 'bones' of the guitar is more or less as good as a Fender guitar of which it is a copy and in fact some Fender guitars, under their budget Squier brand, might even have been made in the very same factory where your guitar was made. Where budget guitars usually differ from more expensive guitars, is the hardware and the electrics, which you can upgrade with better stuff if you like, but for a beginner guitar to learn on or jam along with, it is okay for the job. The tuners will be cheap die-cast ones with probably something like a 10-1 turn ratio (how many times you have to turn the tuning peg button to have the string post make one rotation), which means they won't be very good at super-precise tuning (more expensive tuning pegs will have an 18-1 ratio). Cheap tuning pegs also tend to be made with pretty loose tolerances too, which does not help with very accurate tuning, but for 'messing about' they will probably suffice well enough. The nut is probably just run of the mill white plastic and this is okay, you can get better ones but it will do the job. The three pickups will almost certainly be cheaply-made ones with inexpensive magnets and probably a brass baseplate, but again, they will do the job although they won't sound as good as more expensive ones. Similarly, the wiring, selector switch, volume and tone pots and the jack socket will all be cheap and cheerful and again will do the job but won't be especially good quality. The same is true for the floating bridge/vibrato, which will be cheap cast metal rather than having been milled. Again, it will work, but won't be as sophisticated as a more expensive component. It's worth noting too that whether made in China, Indonesia, Korea, the US, or Europe, beyond cheaper hardware and electrical components being what makes a guitar cheap to manufacture and sell, what also reduces the cost, is the time spent doing finishing and setting up after it is made, because time is money. Cheap guitars tend to get made and given a very quick once over, and then they are packed up and sent out. Thus it's likely that, unless the previous owner spent time setting the thing up and doing things such as polishing the frets etc, it would benefit from having these things done to it. So... All of the cheap component parts can be replaced with better ones, and doing a decent set up on the guitar is not too hard either, and if you are prepared to do that, it could be made into a much better guitar (it would probably cost you a bit less than a hundred quid or so to get all the bits for that and if you spent an hour or two setting it up nicely, that would improve matters a lot), which would mean you'd have a guitar for a total outlay of around 150 quid, plus a bit of your time (not forgetting you got amp too) would be good enough for playing small gigs and recording with, and which would be as good as a guitar in around the 400 quid price bracket providing you did those tweaks. The good news for you is that the Fender Stratocaster is probably the most copied guitar in the world and so there are a ton of after-market spares and bits for them, most of which would fit your guitar, with no modifications since it is a copy with probably the exact same dimensions as a Fender Stratocaster. The means you can find decent bits for Stratocaster copies for not a lot of money. Setting up a guitar is not very hard to do, there are a ton of videos on youtube about how to do that, although you would need a few specific tools to do it well, but these are not hugely expensive to get hold of. The amp is a cheap generic transistor amp which is okay for practicing on, but it won't sound especially great. Then again, if you are just learning and noodling around with the guitar, it will do the job. As far as sounds go, even fairly cheap guitar pickups can sound good through a good amp so the ones on it are okay enough, but conversely, very good pickups will not sound great through a cheap amplifier, so a cheap amp is often the weak link in an electric guitar set up. Having said all that, for 45 quid you did well to get all that you got. It could easily have gone for about 80-100 quid for the guitar and amp if it was on Ebay or Reverb, so it was a bit of a bargain really. Just don't play it standing up with that guitar strap; it looks cheap and nasty and I would not trust it; if it lets go, your guitar will hit the ground hard and that won't do it any favours. Oh, and don't make a habit of propping it up against a radiator. I know you probably did that just to take the picture, but it can cause two things; if the radiator is on, it will heat the guitar neck up and things will expand and mess up the set up of the truss rod, and the square metal edge of the radiator can put dings in the back of the neck, which would be a shame because it looks in pretty good nick. One last thing: You might be unaware that this guitar would have originally had a 'tremelo arm' which could be fitted onto it. Strictly speaking, even though people call these 'tremelo arms', they are more correctly called vibrato arms. They screw into the threaded hole on the lower part of the bridge so you can use this to tilt the bridge back and forth and make the sound waver in pitch. The adjustable springs which counteract that action are accessed under the white plate on the back of the guitar. You can find them on Ebay, Temu, Ali Express etc, be aware however, that there are a couple of different thread sizes for these things, most cheap copies use a 5mm thread, but not all of them. It would look like this if you fitted one, although I think a chrome one would look better than the black one in this picture:
-
People play in all sorts of different ways and in all kinds of different poses which might, or might not, suit them. But the first thing to note is that when you are doing something new with your body, in this case your hands, it can take some time to develop a bit of muscle strength and to get used to moving your hands and fingers in a new way, and this will certainly be part of it, but beyond that, there are some position and technique alterations you can make which will probably help you, so here goes... Position of the guitar: When you see classical guitar players doing a recital, you will note that they often have a foot stool and they hold the guitar like this. There is a good reason for that, and it is that with the neck raised up, your wrist does not have to stretch around the neck so much, so it stops your wrist hurting and your fingers can more easily reach around to fret stuff. Try this little experiment: put your hands in your current playing position as though you were gonna play 'air guitar', now move your fretting hand up to that classical guitar pose and see how much less your wrist has to bend around when it is up there. Now of course everyone who plays rock guitar wants to look cool and have their guitar slung down low in that classic punk style, but doing that makes this problem even worse; you don't have to go mental and have your rock guitar all the way up in that classical pose (because it looks twattish for one thing), but just moving the neck up a little bit will help and even though you are seated, it would help to have a strap a bit shorter in order to support the guitar in that position rather than having to hold it there, so, in short, shorten your strap a bit so it supports the neck up a little bit. Position of fretting hand: Again borrowing from the world of classical guitar, when being taught that, you would be told to place your thumb in the back of the centre of the neck. The reason for that is sort of similar to the first point about the position of the guitar and the ease with which it allows fretting; with your thumb in the back of the centre of the neck, your fingers are further round the neck and come down on the fretboard perpendicular to the strings, which aids in clean fretting and with your thumb behind the neck, when you fret, you have your thumb bracing the neck, so the fretting fingers have something to push against, which means less pressure is required and that stops your fingers from aching. Now of course you see rock guitarists with their thumb over the top of the neck to do lazy G chords and such, and that's okay, but they do that when their hand has developed some strength and they know what they can get away with, and even when players do do that, they still tend to brace the neck against their fingers by cradling it with the base of their thumb, so there is nothing wrong with having your thumb over the neck from time to time, just be aware that it makes it more of a stretch for your fingers when you do that. Economy of movement: A bad habit many guitar players have, is to fret a note with for example their first finger, pluck that note, then lift that finger off as they fret the next note they want with their third finger, then lift that off and fret the note they had before with their first finger by placing that down again, and so on. So their fingers are going up and down all the time and making completely unnecessary extra movements when they could have just kept their first finger down all the time instead of moving their fingers up and down like they were playing a trumpet. This, and playing across the fretboard rather than up and down it, is what helps to develop faster, easier and smoother playing. It also means that some notes could be hammered on or pulled off rather than plucked, which can also make things faster or easier to play. Plucking the strings economically: Another thing people do which slows them down and makes life harder than it needs to be, is playing all downstrokes when picking a riff out, instead of going up and down with the pick alternately. Alternating between up and down movements to pick out notes requires far less movement and so it enables you to play faster as well as requiring far less movement. It will feel awkward at first if you've been doing all downstrokes, but it is worth sticking at it to get used to it, especially if you have a desire to do any of that bloody awful 'shredding' which people seem to want to do, as you need to be able to pluck strings fast to do that. Personally, I think all that shredding stuff is shite and has little musical merit, but if it's something you'd like to end up being able to do, then alternating up and down strokes is going to be essential for it and even for more artistically meritorious playing, it definitely helps. Right hand position and movement: It looks to me like you are already doing that bit right, but just in case you are not, what makes life easier with that, is to rest the fleshy part of your hand (the bit on the opposite side to where your thumb is), on the bridge. this does a few things, it gives your hand some support, it lets you just move your thumb and forefinger in order to play, but can also allow you to pivot your hand too if you like, and it lets you roll your hand forward to mute the strings for chugging rhythm playing, which in combination with fretting hand muting, gets you all the rock music tones you want. The action of the guitar: Kind of hard to tell, and it might be the lighting on your video, but based on the shadow of your strings, it looked like the action of your guitar was a bit on the high side, and that makes fretting need more effort and can contribute to making your hand ache, especially when learning. High actions also cause tuning and intonation issues. There are a ton of videos on places like youtube about how to sort that out. Some of it will require a few specialist tools, but most of it doesn't require anything particularly special. So you might want to look into that as well. All of this is intended to help you rather than to pick holes in your playing, which is actually pretty good, so keep it up and if you find any of the above helpful, it will only improve stuff. And since you were playing some Blackmore stuff, here's an interesting thing he said about learning guitar which you might or might not have heard, he said: 'When I was learning lead guitar, I listened to a lot of saxophone solos, because they were all single notes and so I could do them on a guitar and it helped a lot.'
-
Hi
-
For that kind of budget, you have a lot of scope. A Telecaster is actually a good choice for what you are after in terms of sound (the Telecaster was good enough for Led Zeppelin and the Rolling Stones after all), although it will take some getting used to in terms of playing if you are used to playing bass. Any six string is initially going to feel small and hard to fret if you are used to playing bass of course, but you can get used to it. However, if you really can't get along with that Telecaster, then within your target budget, I'd recommend one of the Epiphone versions of the venerable Les Paul, and there is a good reason for that, which is... A Telecaster has (depending on which exact model it is) a neck width at the nut of about 1.65 inches, whereas most Epiphone Les Pauls (and the pricier Gibsons from which they are derived) have a neck width of 1.69 inches at the nut. This might not seem like a big difference between it and that Tele, but you will definitely notice the difference between that Gibson style neck and a typical Fender neck, since the profile is usually a bit fatter and more rounded on an Epiphone neck as well. What is worth noting too, is that Fenders typically have a scale length of 25.5 inches, whereas Epiphones have a scale length of 24.75 inches. This means the string tension is less on an Epiphone than it is on a Fender, and that's a plus point when learning to fret stuff. Of course if you simply want to be able to bang out a few campfire chords and sing to them when someone asks you to 'play a song', then you could always go with an acoustic or electro acoustic guitar, since these too will have a typically wider neck than the average electric guitar. If you do decide to go with an acoustic, you can go a long way with just a few chords and some 'travis picking'. But back with that Les Paul, and specifically the Epiphone versions, be aware that there are some cheap ones around which have a screw on neck, and some better ones with a set, glued in neck. It's one with a set neck which you want. You will probably find an older second hand one of those on ebay for somewhere around three hundred quid. You might get lucky and pay a bit less of course, particularly for a Les Paul Studio version which doesn't have all the fancy binding on the body (These are very good, particularly the Korean-made ones from around the early 2000s). Don't get hung up about single coil versus humbuckers in relation to the sound you are after; the truth is that it's the amp which has to most affect on how a guitar will sound, not the pick ups, but having said that, if you can find one with P90 pickups, that'll give you the best of both worlds as although P90s are single coils, they sound a lot more ballsy than a typical single coil. If you are not a 'logo snob' and are prepared to go with a copy rather than a Epiphone version of a Les Paul, then I can recommend taking a look at the Fazley Midas on the Bax Music website, which is basically a copy of a Les Paul Gold Top with P90 pick ups. They cost 140 quid and are pretty damn good in spite of that very low price. That'd leave you plenty of cash for a decent amp. Here is my Fazley Midas alongside one of my Les Pauls; as you can see, it's pretty much the same guitar but with P90s rather than humbuckers and without the 1500 quid price tag you pay for a Gibson because of that overpriced logo on the end of it:
-
Harley Benton ST 62 + Fender CS FAT 50's pre-wired
Musical Mystery Tour replied to FrankAtari's topic in Gear Porn
Nah/ Try it, you will hear the difference. -
If you want to do it yourself, it's fairly easy when you know what to do and have a few suitable tools. Like everything, it is easy when you know how and if you are a guitarist, it is worth knowing how to do this, because it means you will get the best out of your guitar and also not have to pay somebody to do it. So - warning, long post ensues - if you read all this, you should be good to go... There are several possible causes for the fret buzz and they could be any one of the following, or possibly several at the same time: The average ambient temperature in your house as the season has changed, has caused the neck relief to alter by virtue of the guitar wood and metal bits having cooled and contracted, or warmed up and expanded. Your typical playing in the same spots on the neck has worn some frets down a bit in some commonly used neck positions, causing the next frets up from those frequently used frets to now be a bit higher up when you fret at the slightly worn down frets, causing string contact at the unworn frets when the strings vibrate as you play. A fret, or several frets, have loosened a bit and raised up a small amount owing to a temperature shift. Vibration from repeated playing has made things settle a bit and change. Something hardware-related has vibrated loose, and this is making things buzz. The strings are making contact with the pick up pole pieces. So, first thing to check, is there anything which has worked loose? Check this by holding things such as the nut, tuning pegs, bridge, pick ups switches etc as you play. If it stops buzzing when you do that, tighten the offending thing up to secure it. Look to see it the strings are touching the pick up pole pieces when you play, if they are , lower the pick ups a bit or lower individual pole pieces by tightening them with a flat head screwdriver. Next press and hold each string down at the high end frets and keep that held down, then move your hand halfway up the neck and tap the strings down onto the frets at around the sixth fret position. You should hear a very slight tap as the string contact the frets, indicating that there is a suitable neck relief gap. The size of this gap is your neck relief amount. To explain what this is: When you play, your strings swing back and forth, and they need some room to do this so they don't hit the frets and buzz, so contrary to what a lot of people think, your guitar's neck is not meant to be completely flat and straight, the neck needs to have a slight bow in it to give the strings some room to swing about as they vibrate. How much of a bow is needed depends on the string gauge you use, because thicker heavier gauge strings can swing around quite a lot as you play, whereas with light strings, not so much. This is the price you pay for having the better tone which thicker strings produce. So, if there is a sufficient gap you can observe and hear when you do that aforementioned tapping test, your truss rod does not need adjusting, but if the neck is more or less flat and there is no neck relief bow, you will need to adjust the truss rod a little. This is not hard to do. Here's how: The truss rod in the neck of your guitar is actually a pair of steel rods, one of which is fixed to the neck, the other can move because is attached to the fixed rod by means of a threaded bolt at one end; loosening or tightening this allows this threaded rod to either push or pull against the fixed one, which then makes the neck either bow backward or forward, which is how the amount of neck relief is adjusted. On an Epiphone Les Paul, this is accessed by removing the three posi screws from the bell-shaped truss rod cover, then inserting an allen key (wrench if you are a Yank) into the truss rod's allen bolt and turning it either right or left. Be aware that you should always make fairly small adjustments and then give the guitar a bit of time to react to the adjustment before making further adjustment, because you need to give the wood of the fretboard time to move slowly as it is pushed or pulled by the truss rod. Large or sudden adjustments can weaken the glue join between the neck and the fretboard, so the golden rule here is to work slowly and only make small adjustments, then wait a while to see what effect that adjustment has had, and then if necessary make a further adjustment. So, the easy way to remember what to do is with the phrase 'righty tighty, left loosey' i.e., looking down the neck from the tuner end of your guitar, turning the allen key to the right will tighten the truss rod, and turning it left will loosen it. IMPORTANT BIT: You should only turn the allen key about a quarter of a turn, then wait a few minutes to see if it has done the job before making a further adjustment. So, if you need more of a bow in your neck to give the strings some room to move, you will be loosening (turning the key left), or if there is too much bow in the neck you will be tightening (turning it right). REMEMBER, GO SLOW, A QUARTER OF A TURN, THEN CHECK. Don't be afraid to make this adjustment, if you follow the above guide, you won't break anything, you'd need to really be very hamfisted and seriously overtighten a truss rod enough to break it. The theory here by the way, is that if you loosen the truss rod a bit, it allows the string tension to pull a bit of a bow into the neck, whereas if you tighten it, the rod pulls back against the string tension and thus makes the neck flatter. Once you understand this is what is going on, it's fairly simple and pretty much common sense to make such an adjustment and it is worth knowing how to do it, because most guitars will probably need this doing maybe once or twice a year as the season changes and the ambient temperature varies. So, that's how to adjust a truss rod. But, this might not be your problem. It could also be a few worn or high frets. This too is fairly easy to fix, but you will need the right tools to do it properly. Having a guitar technician set up a guitar will cost you about fifty quid, but you can buy the necessary tools to do it yourself for considerably less than that, and it is not rocket science, so this is the smarter choice. Your shopping list will be: A fret file such as this. A fretboard levelling ruler and fret rocker set, such as this. A fretboard sanding beam, such as this. Some steel wool. Some fine emery paper. A copper or plastic faced fret hammer, such as this. A neck support such as this. Note that you might find these cheaper, those links I added were just a general guide to what you need to get hold of. You may have some stuff like this already, or tools which can be used which are similar enough to suffice. With these tools, here's what you do: Take the strings off and adjust the truss rod (if necessary) until the fretboard is completely flat (the neck may already be like this with the strings off. Use the fretboard levelling ruler to check this). The reason you want the fretboard completely flat when filing frets, is that you need the fret levelling beam to ride level across the frets when sanding them in order to get them at the same height. Rest the guitar down flat when working, placed on some towels to avoid scratching it, and be sure to support the neck with either a proper neck support stand, or you can if necessary improvise with something suitable such as a few paperback books or similar. When you are sure the neck and fretboard are totally flat, check to see if any frets are higher than they should be by using the fret rocker tool. You will hear it tapping as you rock it across several frets if there are any high frets. Be sure to check thoroughly, across the entire width of the frets. If you find any high frets, mark the top of them with a felt tipped pen. Check to see if these marked frets are high by virtue of not being properly seated and if this is the case, tap them home with your copper or plastic-faced fret hammer. DO NOT use a regular steel hammer, the steel face of a regular hammer is too hard and will dent the frets. Be sure the neck is supported when doing this and be careful not to twat the fretboard! Have a few practice taps with your fret hammer on something else first, to get used to using it. If you are sure all frets are properly seated and you still have high frets when checking them with your fret rocker tool, you will need to sand some of them level. Some sanding beams are equipped with sanding surfaces, others are merely a flat beam which you can attach emery paper to. In either case, use this to sand the offending proud frets down to the level of the others. You don't need to go mental, a few passes will probably do the job. When you think they are fairly close to matching the other frets in height, now you need to 'crown them' again (give them a curved top like they had before you sanded them). This is what your fret file is for. Either tape off the fretboard to protect it, or if your fret file came with some metal fret masks (most of them do) use these to protect the fretboard and give the fret a few passes with the file to round the top of it off again. With all that done, you will need to polish them a bit. Actually, just playing the guitar will eventually do that, but they will feel a bit scratchy as you do that, so polishing them is something you will likely prefer to do. IMPORTANT: Get a plastic bag and put this around the guitar body and tape it closed at the neck. This is to avoid any steel wool shards coming into contact with your pick ups, as they will stick to the magnetic poles and if any shards go into the pickups, they can short circuit them, so you don't want to do that. Now, place your fret masks over the frets, and polish them across-wise with the steel wool. It won't need much. You can also get fret polish and fret rubbers for this purpose, but steel wool will usually do the job okay. After you've done all that, check everything with your fret rocker and if all is good, you are pretty much done. BUT, whilst the strings are off, you might as well treat the fretboard with a bit of lemon oil to make sure the fretboard wood is not too dry. Don't over use that stuff; tip some on a tissue and then apply it from that. Too much lemon oil on a fretboard will make the wood damp and that can make frets work loose, and you don't want to do that, so use lemon oil sparingly. Now, give it a good wipe off to make sure there are no metal shavings on it from all that filing and sanding, take off the plastic bag, string your guitar up, tune it and see if you need to adjust the truss rod to put the relief back in (remember you possibly levelled the fretboard to do all that sanding, and if you did that with the truss rod, simply adjust the rod back to where it was). With all that done, you will probably find you can lower the bridge and get a better action. On an Epiphone LP, that's just a case of adjusting the two flathead screws on the bridge with a suitable screwdriver to lower it a bit. But you are not quite done yet. Having lowered the action, it is very likely that you will need to adjust the intonation (string length) by moving the bridge saddles either backwards or forwards a touch. The reason for this is that with the strings now lower down and closer to the frets, when you fret a string now, it won't have to stretch as much to make contact with the frets, so the chances are you may need to move the bridge saddles forward a bit to shorten the string lengths ever so slightly. Test the need to do this by tuning the guitar, then playing a twelfth fret harmonic, then fretting at the twelfth and seeing if that fretted note is sharp or flat compare to the harmonic. If it is sharp, move the saddle back to lengthen the string a touch, if it is flat, move the saddle forward to sharped the string pitch a little. There are many videos on youtube which show you how to do this sort of thing, but be aware that there are some numpties out there who haven't got a clue what they are doing, so don't just watch one video, watch a few to get a good grounding on the correct way to do stuff. I can recommend watching this guy, he is very clued up and no nonsense about doing this kind of thing and watching his videos will give you the confidence to give this sort of thing a go. You can do it. Just go slow and you will be fine. You are right by the way, I have 26 electric guitars, including some pretty expensive Gibsons Les Pauls, and my Epiphone Les Paul Studio is better than some of the Gibsons.
-
Harley Benton ST 62 + Fender CS FAT 50's pre-wired
Musical Mystery Tour replied to FrankAtari's topic in Gear Porn
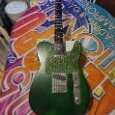
Nope, it doesn't matter as much as people seem to think it does, unless the aesthetics are a big concern, in fact, a very slightly loose neck pocket is actually a good thing, and here's why that is so: Whenever you first screw a neck on a guitar, you obviously do so while the strings are not on the guitar, but what happens when you do that, is the guitar neck is then held down against the body as the screws tighten, rather than back against the body as it should be, in order to make more a more solid resonating contact (like a set neck has), and that lack of body contact from the rear of the neck kills the tone. So, here's what you do to solve that problem: Put the neck on as you normally would, string the guitar up and tune it - now here's the part most people don't do, and should - keep it tuned up with string tension then undo each screw a little bit to allow the string tension to pull the neck back against the body, now tighten the screws up. This will give your guitar more sustain and definitely improve the tone. You may have to correct the intonation a very tiny bit when you do this, but it is the reason why people find a lot of bolt-on neck guitars not as good as they can be. That HB guitar looks great by the way and the cream coloured hardware definitely sets it off nicely. Here's one of my Strats with a better, more vintage-coloured scratchplate than it came with, and some cream coloured bits which I added: -
Well, when I first read on the specs that it had a poplar fretboard, I was a bit 'oh, erm....', because poplar isn't a particularly hard wood as far as I'm aware, but in fact it's fine. Dunno whether they've treated it in some way to make it tougher or something, but it seems okay
-
That is a Fazley Midas FLP318GT. Fazley is Bax Music's own in-house brand of guitars; they are pretty decent guitars for the money, and that one sounds great. Mahogany body and neck, poplar fretboard. I was considering swapping the P90s on it when I ordered it, but when I plugged it in, the P90s surprised me with how good they sounded, so they are staying. I will be putting some Grover tuners on it though and I might stick some upgraded wiring, pots and switches in, but for the moment it's doing okay as it came.. Considering they are 143 quid new (I paid a 126 quid for that one because it had a minor blemish on it), you can't really go wrong with them. I paid a ton for a second-hand plywood Columbus Les Paul copy with a bolt-on neck nearly forty years ago, so it just goes to show how far we've come these days in terms of bang for your buck. :
-
Strat 5-way blade duff - replace with 3 switches?
Musical Mystery Tour replied to Greenstep's topic in Repairs and Technical
I'd be inclined to just bang a new switch in. The only advantage/disadvantage (depending on how you look at it) of going with individual switches is that you could choose their placement and thus get rid of the one major problem the Strat design has - that of the switch being conveniently placed for changing stuff mid song, but unfortunately also in the ideal position to get accidentally knocked into a different selection when playing rhythm - which is something I personally find fecking annoying on the Stratocaster. The pick up toggle switch positioning is far better on the Telecaster and the Les Paul. Leo got most things right, but he dropped the ball on the Strat selector switch positioning. -
FUZZ! Recommend me a cheap pedal.
Musical Mystery Tour replied to EliasMooseblaster's topic in Effects
Best and certainly cheapest option would be the Behringer SF300 Super Fuzz, which is a shade north of twenty quid new, or about fifteen quid used (and there are a lot of them about). Like many Behringer pedals, it's essentially a copy of a Boss pedal, in this case their FZ2 Hyper Fuzz, which being discontinued, is hard to find in good nick for less than three hundred quid. The Boss FZ2 is sort of a copy of the Univox Super Fuzz, and an original one of those would be hard to find in good nick for much less than a grand. So, for the price of a round of drinks in a pub, you can get that classic Hendrix Univox Fuzz and the Big Muff sound as well as more subtle overdrive and level increases with the Behringer SF300 Super Fuzz. Thus you can get more modern tones such as Chilli Peppers, Nirvana, Smashing Pumpkins etc as well as that Sixties and Seventies stuff by changine the modes and tweaking the control knobs. A lot of people get hung up on Behringer pedals being housed in ABS rather than metal cases, but don't let that put you off, ABS is very tough; you'd have to be a right lead-footed clumsy git to ever break a Behringer pedal case (and even if you could manage to do so, you've broken a twenty quid pedal), which is why I'm happy to have four of the nine pedals on my board be Behringer ones, because they are decent, reliable and as noted, most of them are basically knock offs of Boss pedal circuits with a few additional whistles and bells added, but for considerably less dosh. Although the sounds out of the SF300 are good and very versatile, it does have one slight downside compared to the Boss Hyper Fuzz, and that's the control knobs, which are a tad smaller than those on the Boss and a bit more closely grouped together, but they kind of had to do that becuse the SF300 has an additional three-position mode select switch which gives you a choice of Fuzz 1, Fuzz 2 and Boost, making it a bit more versatile than the Boss. The Boost means you can sort of use it as an overdrive-ish type of pedal as well, so it can even be a bit Klon-ish. However, be aware that the size of the knobs makes it perhaps less than ideal in a gig situation for quick changes on the fly on a dark stage mid-song, but if you are happy to set and forget it for each tune and either kick it on or off as needed, it's not really a major issue, and for 'bedroom' playing or home studio use, this is a non-issue. So for twenty-odd quid, you really can't go wrong with something offering you all those options in one pedal. -
I would be inclined to use a resonator guitar and add a pick up to it, going into something simple such as a Caline Lorcan amp, which is small but loud enough for what you want, can even run without mains for three hours, and has a built in delay effect, then go through an EQ pedal to the Lorcan (up to three pedals can take power from the Lorcan - it comes with the cables for that purpose). In that way, if the resonator isn't doing it all on its own, you can use the EQ to give the pickup on the guitar the necessary frequencies to have it poke through a suitable frequency hole in the accordian's range. I can recommend the Recording King RPH-R1-TS Dirty Thirties resonator, which is comparatively inexpensive (abut 300 quid), but with its spruce top and resonator, it is bright yet has some warmer undertones too, so it hits quite a broad range of frequencies, and if you added a pick up to it, its range could be further tailored to suit you requirements even more via an EQ pedal.
-
Looking for electric guitar advices for a teenage girl
Musical Mystery Tour replied to Goldilocks33's topic in Introductions
To be fair, the set up on the Harley Benton TE52 Telecaster which I have, was not bad as it came. I did tweak it a bit, and ended up swapping the neck pick up for a PAF, but it was genuinely playable right out of the box and would have been okay even if I left it completely stock. It's on par with my Fender Telecaster which was obviously a lot more expensive, but frankly, that's just a case of having paid for the name. Even if a guitar does require a bit of setting up, it's usually only about 40 quid for a guitar tech to do it, although if you have some fairly basic tools, you can do it yourself and there are a ton of videos on youtube which will show you how to do this. It's not rocket science; if you are the kind of person who can wire a plug, you can do a guitar set up.

